How to Draw Poseidon A Step-by-Step Guide
About ancient religions and belief methods, few are as well-known as Greek folklore. Most people have heard of famous figures like Zeus, Hades, and Poseidon, thanks to their appearances in countless movies, books, video games, and more. Poseidon is one of the most interesting Greek gods and was believed to be the sea god.
He is usually shown with his trademark trident, and no guide on how to draw Poseidon would be done without him! Included in this tutorial before you. We hope you have a great time diving underwater with this fantastic step-by-step guide on drawing Poseidon in 6 steps!
Also read: house drawing for kids
How to Draw Poseidon – Let’s Get Started!
Step 1
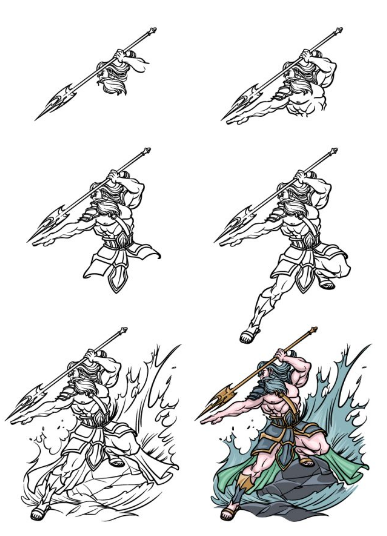
We will present a relatively classic representation of the god of the sea in this guide on drawing Poseidon. For the tutorial’s first step, we’ll focus mainly on his head, arm, and trident. We’ll start with the first half of the trident, and you can start this with two straight lines close to each other.
Next, we’ll use some curved lines to create the sharp, pointed tips of the trident. Once you draw him, you can add his hand holding it and then connect it to the first part of his muscular arm. To finish this step, you can draw his intense facial expression and use many curved lines for his beard: mustache, and hair. The last thing to add is the back of the fork handle, and then we can move on to the next step.
Step 2
For the second part of this Poseidon drawing, we’ll start drawing his chest and add more to his two arms. First, you can draw some curved line shapes on the left side of his face to create armor—pieces on the upper arm that we will remove soon. Then we’ll pull the arm these armor pieces are on, which will be straight and look very muscular.
Next, remove the bicep of the component you started in the previous step. The bicep for this arm will be marked with curvier lines to make them look very muscular. Then we’ll finish this step by drawing his chest and the beginning of his waist, and then we’ll continue with step 3.
Step 3
We will now draw more of the armor he is wearing in this third step of our guide on how to draw Poseidon. First, draw a curved strip diagonally across his chest. Next, we’ll remove a large, elaborately decorated belt at his waist.
This belt will have a small border at the top and bottom and some vertical lines running down it. Finally, we’ll draw some pieces of cloth that fall over his legs and down from the belt buckle.
Step 4
We’ll be moving on to a watery base for the sea god soon, but first, we’ll draw some legs for him in this step of your Poseidon drawing. The left leg will extend at a somewhat right angle. His pointed boot will also cover the shin and foot of this leg.
Then the portion on the right side will be next. This leg will be turned and raised much better than the other. The reasoning for this position will become apparent when we extract the basis in the next step.
Step 5
We are now ready to finish the final details in this step of our guide on how to draw Poseidon. This will be ready for the final stage, where we will color it. First, we’ll outline some round shapes under his legs to show that he’s standing on some rocks in the ocean.
Once they’re drawn, we’ll outline some much more extended, sharper lines for the jet of water hitting the rocks behind it. This base is effective in showing off his power over the ocean! What other details can you think of to add to this stunning image?
Step 6
This is the final step of your Poseidon drawing, and in it, we will finish with some color. Our contact image shows you one of the multiple ways you can color this creator. We used some more muted tones for both Poseidon and the surrounding details as it fits in with the watery theme.
If you prefer, you can use some colors that are much more intense, and this is your chance to use your unique color scheme. Then, once you’ve chosen the colors, all that’s left is to select the artistic mediums he’ll use to achieve them. We can’t wait to see what you desire!